
Owner: Aaron Fitzell
Last Updated: 2026-02-28
Version: 1.0
(have an idea for how this SOP could be better? Please fill out the Suggest Edit form at the very bottom of this procedure)
Procedure Info
Tags
destination board, display, sign, front sign, LED, destination display, route display, signage, board, setting destination, headsign, desto, desto board, self guided, selfguided, self-guided
Purpose
This is a general guide to help drivers learn how to use the Hanover destination display board selector to select a route name that will display on the outside of the bus for passengers to see.
This is one of our most important procedures for safeguarding passenger satisfaction; if the display board is not set correctly the waiting passenger will not know which bus to board. And if they miss their bus they will definitely be unhappy!
That’s why it’s important for ALL DRIVERS to be familiar with the variety of route selector control panels they might encounter.
When to Use This SOP
Driver’s must visually check their destination boards (from the outside of the bus) every run, even if they believe they were the last one to drive the bus.
Who Should Use This SOP
Drivers headed out on runs.
Tools and Resources Needed
(List the equipment, tools, electronics or software needed to complete this procedure.)
Scrolling to Select Route
(applicable to Hanover 1 and Hanover 2 boards)
1. Locate the Hanover Control Panel
This may be:
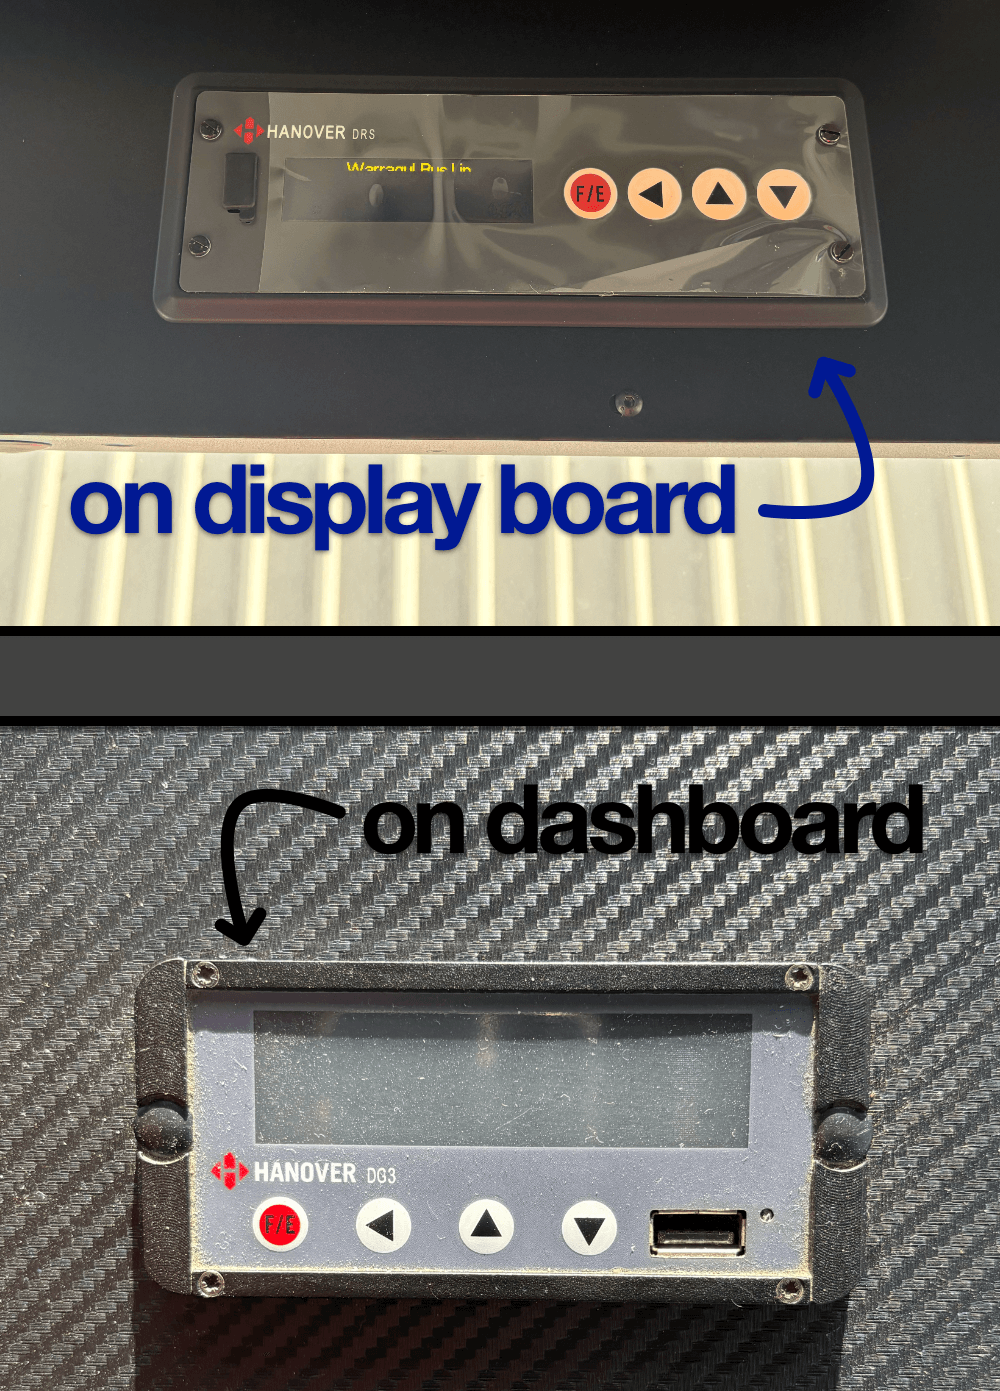
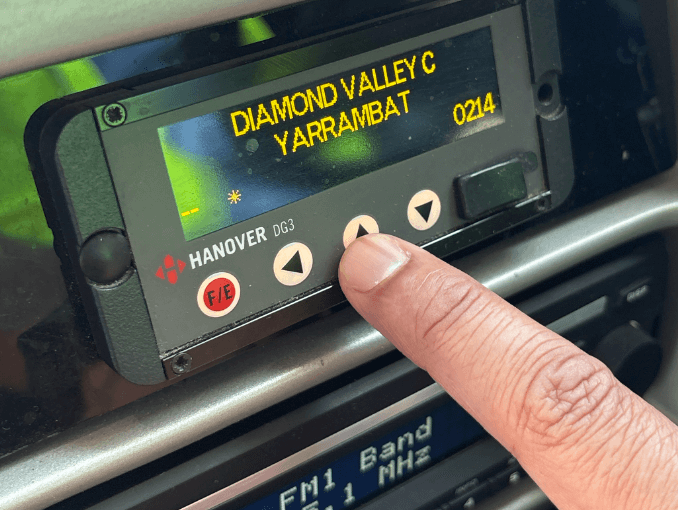
2. Scroll Through and Find the Correct Route
Use the Up (▲) or Down (▼) arrow buttons to scroll through the allocated school run.
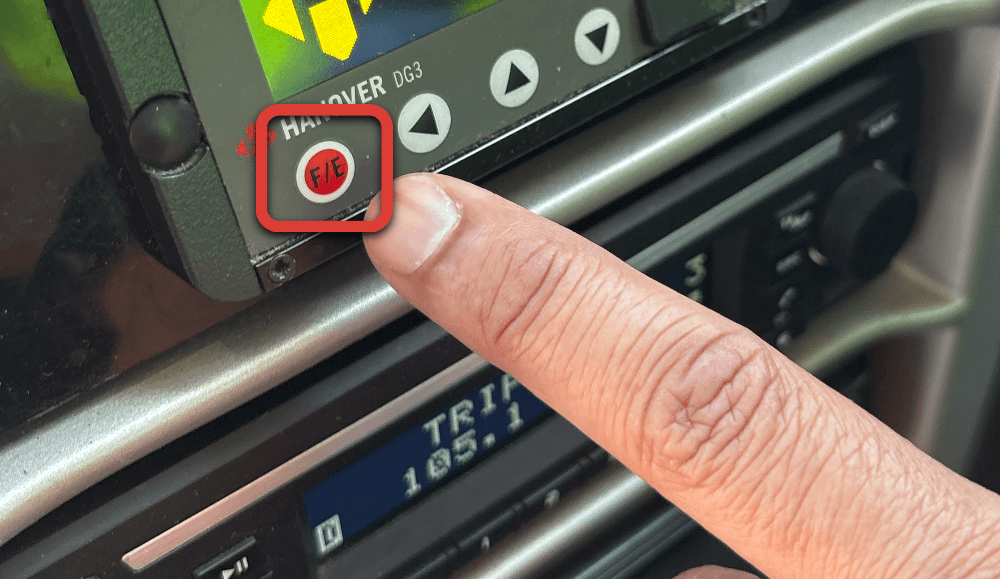
3. Confirm Selection
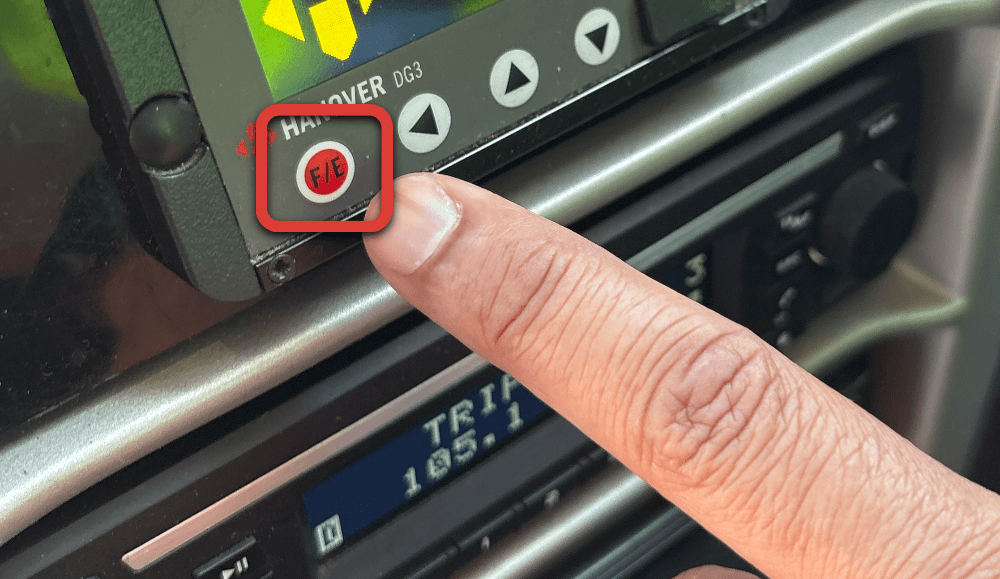
Press the red F/E button to confirm the selected route.
Or wait 5 seconds after scrolling to the route and the display with change automatically.
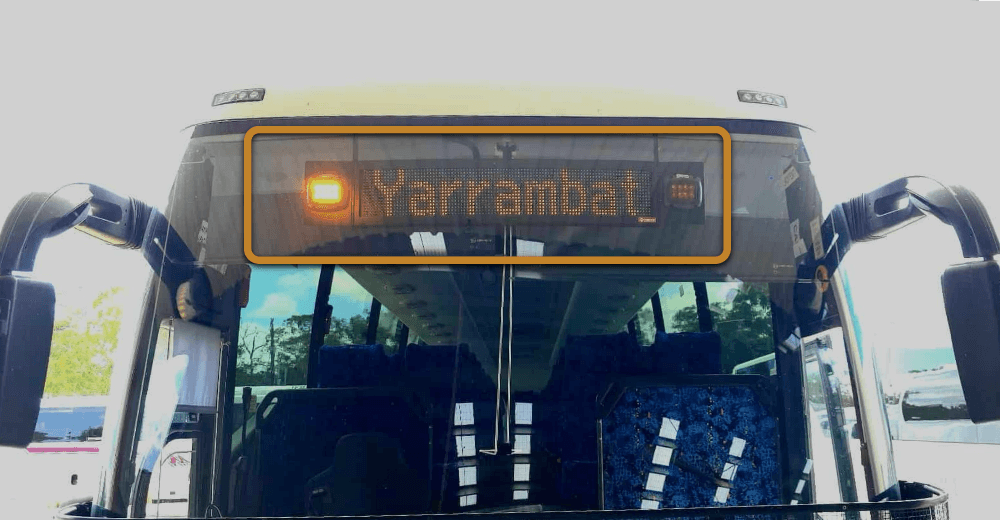
4. Verify Route is Displaying Correctly
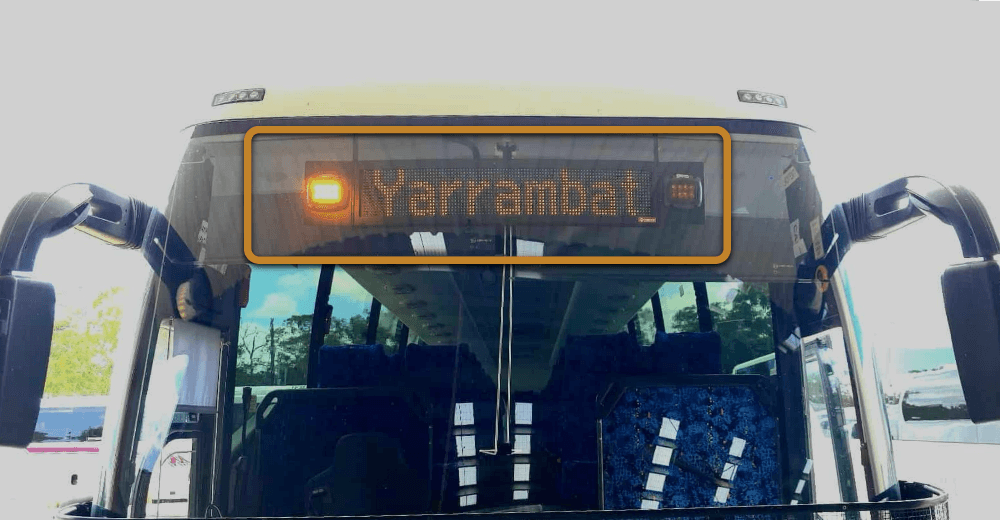
Step outside the bus and confirm that the route you selected is being displayed.
Entering Code to Select Route
1. Locate the Route Code in Driver Handbook
Four-digit codes are located:
- Driver Handbook > Part 4 - Charter / School Runs > Pages 9-16
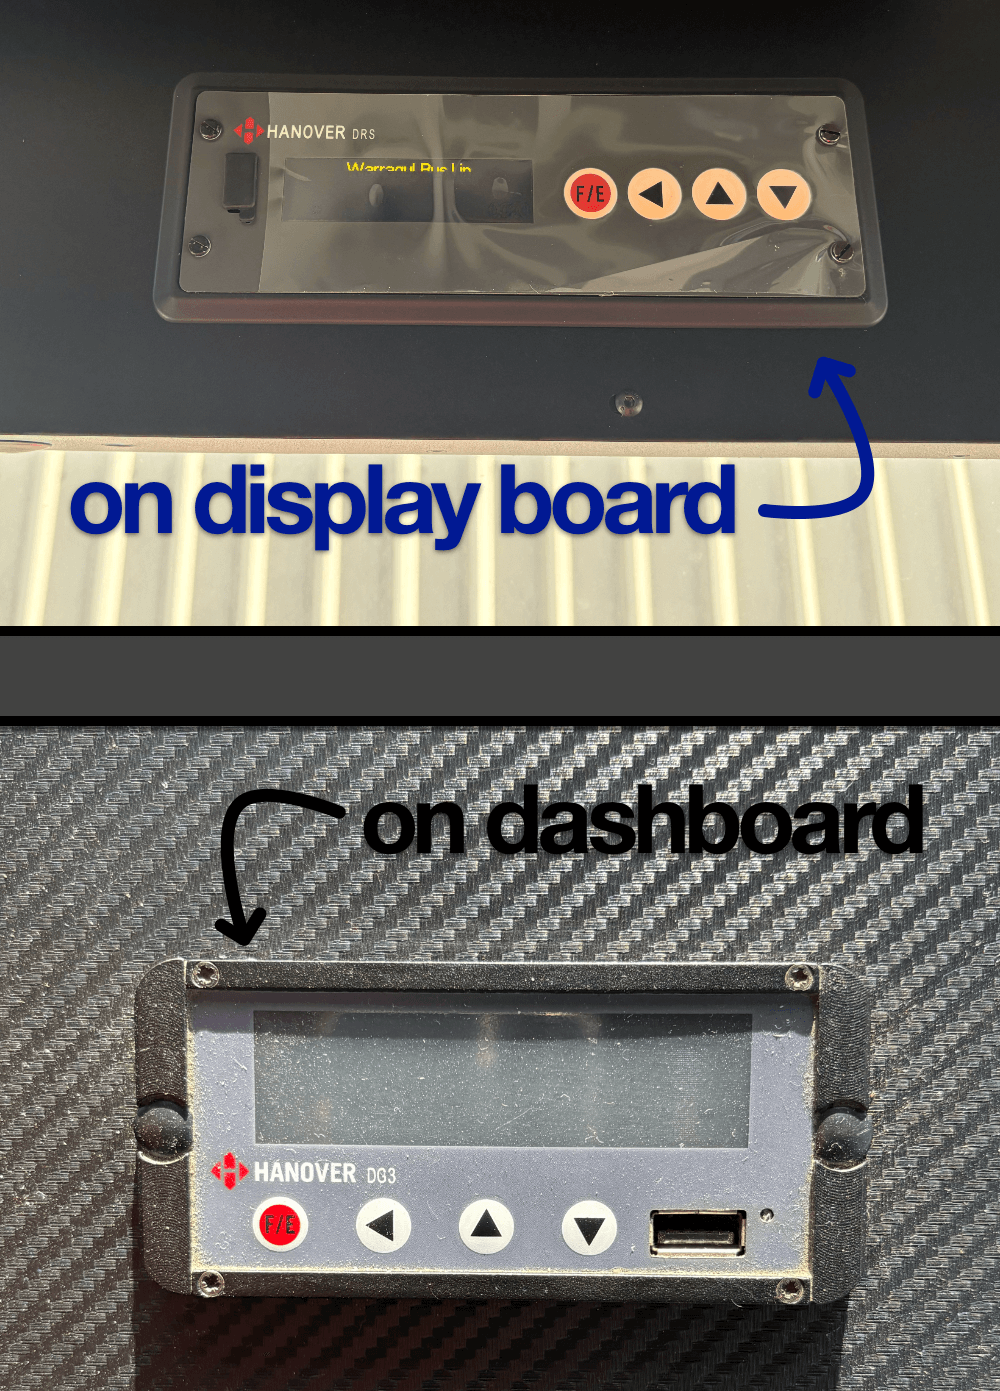
2. Locate the Hanover Control Panel
This may be:
- On the dashboard (driver area), or
- On the Electronic Destination Display Board itself.
3. Enter Code into Controller
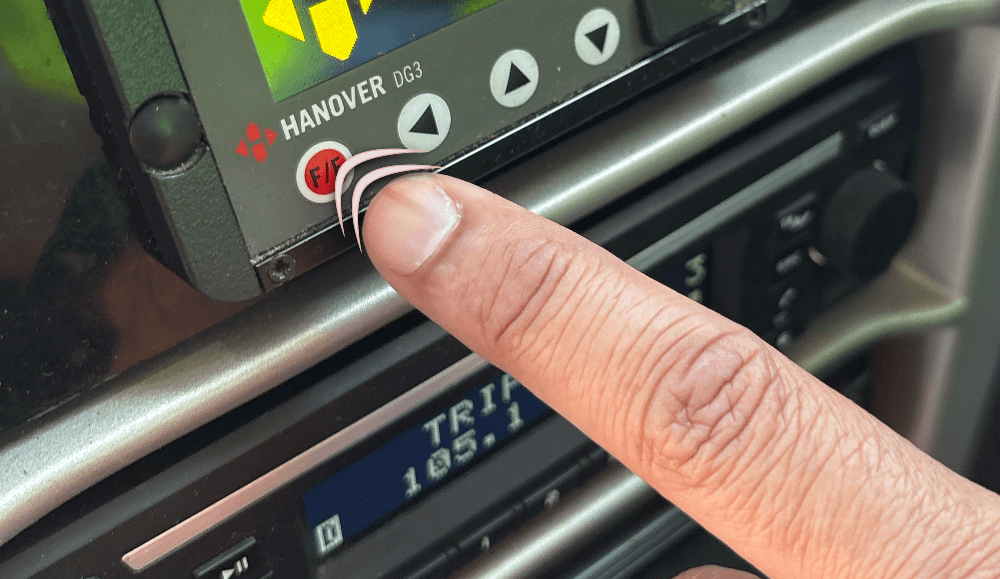
- Press the red F/E button repeatedly until
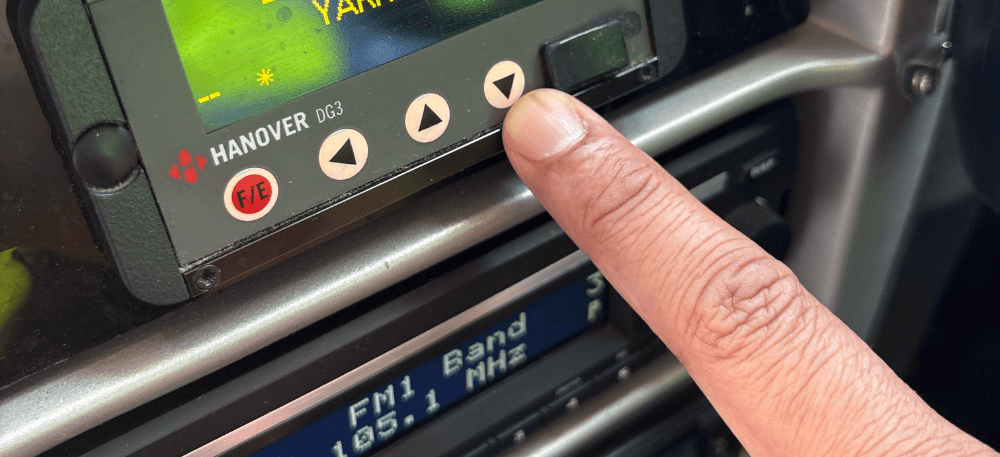
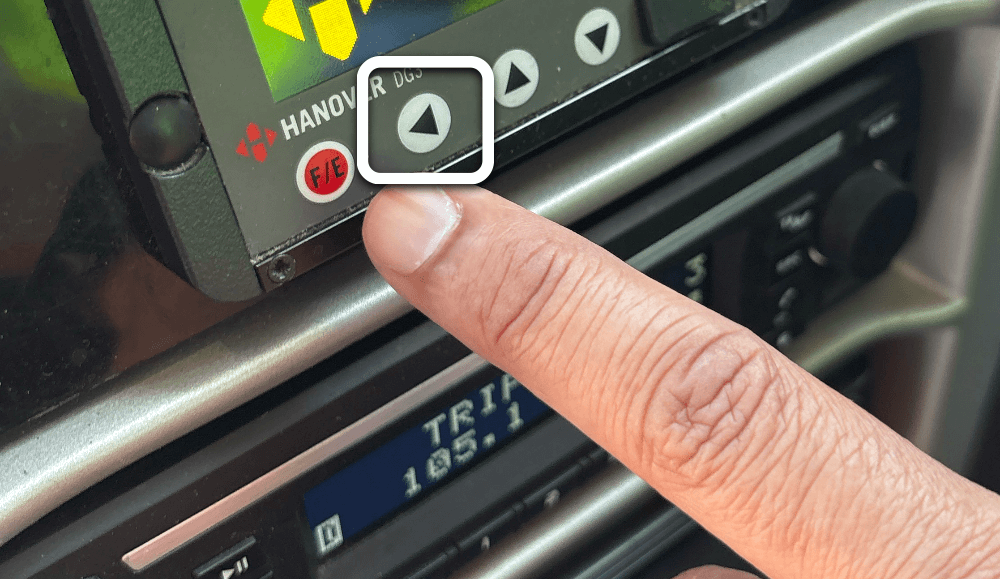
CODEis displayed, press the (◀) Key. - Use the Up (▲) or Down (▼) arrow buttons to cycle through numerals.
- When correct numeral is displayed, press the (◀) Key to select and move to the next digit.
- Repeat process for remaining numerals.
4. Confirm Code
Once you’ve entered the entire code press the red F/E button to confirm.
5. Verify Route is Displaying Correctly
Step outside the bus and confirm that the route you selected is being displayed.
6. Destination Board Code List
| Code | Screen 1 Text | Number Displayed | Screen 2 Text |
| 0001 | Panorama | ||
| 0002 | Not in Service | ||
| 0003 | School Bus | ||
| 0004 | Charter | ||
| 0009 | V/Line | ||
| 0010 | V/Line | Southern Cross | |
| 0011 | V/Line | Flinders St | |
| 0012 | V/Line | Traralgon | |
| 0013 | Train Replacement | ||
| 0014 | Commonwealth Games | ||
| 0101 | Carey Bapt GS | ||
| 0102 | Carey | Bulleen | |
| 0103 | Carey | Ashburton Rec'n | |
| 0104 | Carey | Boroondara Sports | |
| 0105 | Carey | Boroondara Tennis | |
| 0106 | Carey | Box Hill Ath's | |
| 0107 | Carey | Hawthorn Hockey | |
| 0108 | Carey | MacLeay Park | |
| 0110 | Carey | Mnghm DISC | |
| 0111 | Carey | Melb Badminton | |
| 0112 | Carey | Mullum Mullum Stdm | |
| 0113 | Carey | Veneto Club | |
| 0114 | Carey Bapt GS | Carey Badminton | |
| 0115 | Carey Bapt GS | Carey Cricket | |
| 0116 | Carey Bapt GS | Carey Football | |
| 0117 | Carey Bapt GS | Generations in Jazz | |
| 0118 | Carey Bapt GS | Carey Hockey | |
| 0119 | Carey Bapt GS | Carey Music | |
| 0120 | Carey Bapt GS | Carey Netball | |
| 0121 | Carey Bapt GS | Carey Rowing | |
| 0122 | Carey Bapt GS | Carey Sport | |
| 0123 | Carey Bapt GS | Carey Tennis | |
| 0124 | Carey Bapt GS | Hatta-Kulkyne NP | |
| 0125 | Carey Bapt GS | Toonallook | |
| 0126 | Carey Bapt GS | Wabonga | |
| 0127 | Carey Bapt GS | Anglesea | |
| 0128 | Carey Bapt GS | Marysville | |
| 0129 | Carey Bapt GS | Phillip Island | |
| 0130 | Carey Bapt GS | Merrijig | |
| 0131 | Carey Bapt GS | Grantville | |
| 0132 | Carey Bapt GS | Merricks | |
| 0133 | Carey Bapt GS | Corop | |
| 0134 | Carey Bapt GS | Corop | |
| 0135 | Carey Bapt GS | Gippsland | |
| 0136 | Carey Bapt GS | Grampians | |
| 0137 | Carey Bapt GS | Harrietville | |
| 0138 | Carey Bapt GS | Beechworth | |
| 0139 | Carey Bapt GS | Beechworth | |
| 0140 | Carey Bapt GS | Warrnambool | |
| 0141 | Carey Bapt GS | Donvale | |
| 0142 | Carey Bapt GS | Donvale 1 | |
| 0143 | Carey Bapt GS | Donvale 2 | |
| 0144 | Camberwell GS | ||
| 0145 | Camberwell GS | Box Hill Indoor | |
| 0146 | Camberwell GS | Fairfield Park | |
| 0147 | Camberwell GS | Gordon Barnard | |
| 0148 | Camberwell GS | Hislop Park | |
| 0149 | Camberwell GS | Koonung SC | |
| 0150 | Kew / Toorak | ||
| 0151 | Kew 1 | ||
| 0152 | Kew 2 | ||
| 0153 | Kew 3 | ||
| 0154 | KEW 4 | ||
| 0155 | Burke Hall | ||
| 0156 | Rossbourne | ||
| 0200 | CLC | ||
| 0201 | CLC | St Andrews | |
| 0202 | CLC | Mill Pk-Civic Dr | |
| 0203 | CLC | Laurimar-St Helena | |
| 0204 | CLC | Nth Ringwood-W'dyte | |
| 0205 | CLC | Whittlesea-Doreen | |
| 0206 | CLC | Templestowe | |
| 0207 | CLC | Wollert | |
| 0210 | Diamond Valley College | ||
| 0211 | Diamond Valley College | I1 | Arthurs Creek 1 |
| 0212 | Diamond Valley College | I2 | Arthurs Creek 2 |
| 0213 | Diamond Valley College | H | Kangaroo Ground |
| 0214 | Diamond Valley College | J | Yarrambat |
| 0215 | Diamond Valley College | K1 | Kinglake 1 |
| 0216 | Diamond Valley College | K2 | Kinglake 2 |
| 0221 | Eltham College | ||
| 0222 | Eltham College | Whittlesea / Doreen | |
| 0223 | Eltham College | Mill Park | |
| 0225 | Eltham College | St Andrews | |
| 0227 | Eltham High | ||
| 0230 | Hume Anglican Grammar | ||
| 0231 | Hume Anglican | 1 | Freier Northern |
| 0232 | Hume Anglican | 2 | Freier Eastern |
| 0233 | Hume Anglican | 3 | Freier Southern |
| 0234 | Hume Anglican | 4 | Freier Western |
| 0235 | Hume Anglican | 5 | Freier North East |
| 0236 | Hume Anglican | 11 | Kalkallo Southern |
| 0237 | Hume Anglican | 12 | Kalkallo Northern |
| 0238 | Hume Anglican | 13 | Kalkallo Eastern |
| 0239 | Hume Anglican | 14 | Kalkallo Western |
| 0240 | Hume Anglican | 21 | Donnybrook Inner West |
| 0241 | Hume Anglican | 22 | Donnybrook South East |
| 0242 | Hume Anglican | 23 | Donnybrook South West |
| 0243 | Hume Anglican | 24 | Donnybrook North West |
| 0244 | Hume Anglican | 25 | Donnybrook Eastern |
| 0245 | Hume Anglican | 26 | Donnybrook Southern |
| 0246 | Hume Anglican | 27 | Donnybrook Western |
| 0247 | Hume Anglican | 28 | Donnybrook Northern |
| 0248 | Hume Anglican | 29 | Donnybrook North East |
| 0249 | Hume Anglican | 30 | Donnybrook Outer Southern |
| 0250 | Plenty Valley CC | ||
| 0251 | Plenty Valley CC | 1 | Strathewan/Arthurs Ck/Doreen |
| 0252 | Plenty Valley CC | 2 | St Helena-Rosanna |
| 0253 | Plenty Valley CC | 3 | Eltham/Wattle Glen/KG |
| 0254 | Plenty Valley CC | 4 | Kinglake/Whittlesea/Eden Park |
| 0255 | Plenty Valley CC | 5 | Bundoora/G'borough |
| 0256 | Plenty Valley CC | 6 | Hurstbridge/St Andrews |
| 0257 | Plenty Valley CC | 7 | South Morang |
| 0258 | Plenty Valley CC | 8 | Hidden Vly/Bev'rdg/D'brook |
| 0259 | Plenty Valley CC 9 | 8 | Epping North |
| 0260 | Plenty Valley CC | 10 | Mickleham/C'burn/Wollert |
| 0270 | St Monica's College | ||
| 0280 | Templestowe College | ||
| 0281 | Templestowe College | Diamond Creek | |
| 0282 | Templestowe College | Hurstbridge | |
| 0283 | Templestowe College | St Helena | |
| 0284 | Templestowe College | Research | |
| 0285 | Warrandyte PS | ||
| 0286 | WHITTLESEA SECONDARY COLLEGE | 8 | CRAIGIEBURN |
| 0287 | WHITTLESEA SECONDARY COLLEGE | 4 | KILMORE / HIDDEN VALLEY / WALLAN |
| 0289 | WHITTLESEA SECONDARY COLLEGE | 10 | WALLAN |
| 0290 | Broadford Secondary KE | ||
| 0300 | Anderson Ck Ps | ||
| 0301 | Antonio Park PS | ||
| 0302 | Balwyn PS | ||
| 0303 | Banyule PS | ||
| 0304 | Belle Vue PS | ||
| 0305 | Beverley Hills PS | ||
| 0306 | Biralee PS | ||
| 0307 | Blackburn HS | ||
| 0308 | B'burn Lake PS | ||
| 0309 | Boronia Hts PS | ||
| 0310 | Boroondara Pk PS | ||
| 0311 | Box Hill HS | ||
| 0312 | Bundoora SC | ||
| 0313 | Canterbury Girls SC | ||
| 0314 | Diamond Ck PS | ||
| 0315 | Donburn PS | ||
| 0316 | Donc Gardens PS | ||
| 0317 | Doncaster PS | ||
| 0318 | Donvale CC | ||
| 0319 | East Doncaster SC | ||
| 0320 | Eltham PS | ||
| 0321 | Eltham East PS | ||
| 0322 | Eltham Nth PS | ||
| 0323 | Firbank GS | ||
| 0324 | Glendal PS | ||
| 0325 | Hazel Glen Coll | ||
| 0326 | Ivanhoe PS | ||
| 0327 | Ivanhoe East PS | ||
| 0328 | Kew East PS | ||
| 0329 | Koonung SC | ||
| 0330 | Mernda Central | ||
| 0331 | Milgate PS | ||
| 0332 | Mill Park SC | ||
| 0333 | Mont Albert PS | ||
| 0334 | Montmorency PS | ||
| 0335 | Montmorency South PS | ||
| 0336 | Mooroolbark College | ||
| 0337 | Mooroolbark College | Adelaide | |
| 0338 | Mooroolbark College | Adelaide Hills | |
| 0339 | Mooroolbark College | Barossa Valley | |
| 0340 | Mooroolbark College | Glenelg | |
| 0341 | Mooroolbark College | Hahndorf | |
| 0342 | Mooroolbark College | Port Adelaide | |
| 0343 | Panton Hill PS | ||
| 0344 | Ringwood SC | ||
| 0345 | Ringwood SC | Generations in Jazz | |
| 0346 | Scotch College | ||
| 0347 | Scotch College | Scotch Rowing | |
| 0348 | Serpell PS | ||
| 0349 | Solway PS | ||
| 0350 | SS Peter & Paul's PS | ||
| 0351 | St. Bridget's PS | ||
| 0352 | St Charles Borromeo PS | ||
| 0353 | St Clement of Rome | ||
| 0354 | St Francis Xavier | ||
| 0355 | St Kevins Coll | ||
| 0356 | St Kevins Coll | Generations in Jazz | |
| 0357 | St Martin of Tours PS | ||
| 0358 | Tintern Grammar | ||
| 0359 | Templestowe Hts PS | ||
| 0360 | Templestowe Pk PS | ||
| 0361 | Templestowe Vly PS | ||
| 0362 | Vermont PS | ||
| 0363 | Viewbank PS | ||
| 0364 | Warrandyte High | ||
| 0365 | Watsonia Nth PS | ||
| 0366 | Wattle Park PS | ||
| 0367 | Xavier College | ||
| 0368 | Yarrambat PS | ||
| 0400 | MLC | ||
| 0401 | METHODIST LADIES COLLEGE | ||
| 0501 | Anglesea YMCA | ||
| 0502 | Burnside Camp | ||
| 0503 | Camp Howqua | ||
| 0504 | Camp Marysville | ||
| 0505 | Camp Toolangi | ||
| 0506 | Camp Wilkin Bapt Ctr | ||
| 0508 | Coonawarra | ||
| 0509 | Forest Edge | ||
| 0510 | Forest Lodge | ||
| 0511 | Ferngully Lodge | ||
| 0512 | Karoonda Park | ||
| 0513 | Lake Dewar Lodge | ||
| 0514 | Lakewood Park | ||
| 0515 | Mt Evelyn Rec'n | ||
| 0516 | Oasis Camp | ||
| 0517 | Phillip Is. Adventure Resort | ||
| 0518 | Camp Rumbug | ||
| 0519 | Sovereign Hill Lodge | ||
| 0520 | Waratah Beach Camp | ||
| 0521 | Waterford Cmp | ||
| 0522 | Wombat Cnr Camp | ||
| 0523 | Burras '19 Lorne Trip | ||
| 0524 | Burratarians | ||
| 0525 | Burratarians | Burras '19 Lorne Trip | |
| 0526 | |||
| 0527 | Extend (Aust) | ||
| 0528 | |||
| 0529 | |||
| 0601 | Falls Creek | ||
| 0602 | Lake Eildon NP | ||
| 0603 | Lake Mountain | ||
| 0604 | Marysville | ||
| 0605 | Mount Buller | ||
| 0610 | Mount Hotham | ||
| 0615 | Phillip Island | ||
| 0801 | ACMI | ||
| 0802 | Aqualink | ||
| 0803 | Bill Sewart Ath's | ||
| 0805 | CERES | ||
| 0806 | Chinese Museum | ||
| 0807 | Aquarena | ||
| 0808 | Doncaster Ath's | ||
| 0809 | Donvale Res. | ||
| 0810 | Edendale Farm | ||
| 0811 | Enchanted Adventure Garden | ||
| 0812 | Hagenauer Res. | ||
| 0813 | Hamer Hall | ||
| 0814 | Healesville Sanctury | ||
| 0815 | LEGO Learning Ed Ctr | ||
| 0816 | Manningham Disc | ||
| 0817 | MCG | ||
| 0818 | Meadow Glen Ath's | ||
| 0819 | Melb' Airport | ||
| 0820 | Melb' Aquarium | ||
| 0821 | Melb' Museum | ||
| 0822 | MSAC | ||
| 0823 | Melbourne Zoo | ||
| 0824 | Monash Univ. | ||
| 0825 | NGV | ||
| 0826 | Parliament House | ||
| 0827 | Robert Blackwood Hall | ||
| 0828 | Scienceworks | ||
| 0829 | Shrine of Remembrance | ||
| 0830 | Sovereign Hill | ||
| 0831 | Watermarc | ||
| 0832 | Werribee Zoo | ||
| 0900 | MOTO GP |
Review Schedule and Change Log
| Version | Date | Author | Change Summary |
| 1.0 | 2026-02-28 | Joel Smith | Initial draft |
| 1.1 | 2026-07-15 | Aaron Fitzell | Added Desto Codes |